Posts

Showing posts from January, 2016

Last step in Woven Paracord Bracelet/Watchband

Image
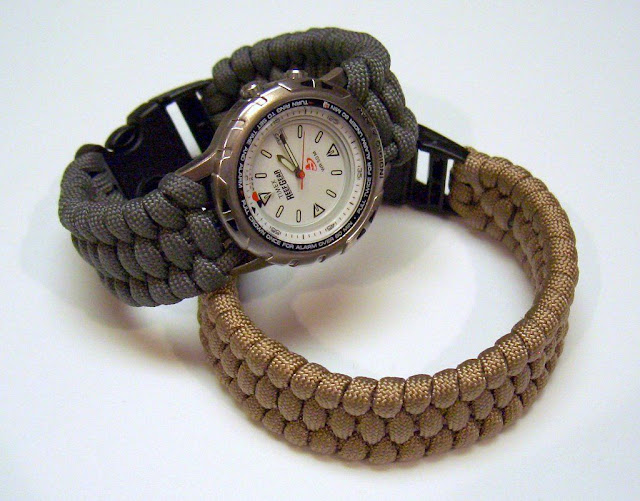
Step 7: Finishing up To finish up, you'll take the working strand around one of the outer cord, so it's coming thru the under side of the bracelet/watchband. *Check for a good fit on your wrist at this point. If it's too loose or too tight, untie, adjust your starting measurement longer or shorter to correct, and try again. Take your hemostats and work them thru about three of the center weaves, towards the buckle end. Grasp the working strand and pull it back thru the center weaves. Trim the end with your scissors, quick melt the end to prevent the cord from fraying, and tuck it under the weave. Now do the same with the shorter end of cord and you're done. If you measure again, you'll see that the finished length is about 1 inch longer than the starting measurement. This will vary depending on your tightening of the weave as you go, but should make for a loose/comfortable fit. Enjoy! *Anyone that's worn a nylon/

Step 6 in Woven Paracord Bracelet/Watchband

Image
Step 6: Continue on the other side of the watch Continue weaving the paracord, keeping a uniform look, and tightening as you go. A pair of hemostats can help work the cord around as you get close to the buckle end, making the last couple of weaves.

Step 5 in Woven Paracord Bracelet/Watchband

Image
Step 5: Threading the watch Once you've reached the point where your watch will be centered, push the watch tight against the woven cord and bring your working strand thru the pin along side the other cords under the watch, and back thru the other pin. *If making the bracelet, there' s no watch in the way, so just keep weaving. ;)

Step 4 in Woven Paracord Bracelet/Watchband

Image
Step 4: Begin weaving Now you begin weaving the long working end of your paracord. The shorter end will be left out until it's time to finish the bracelet/watchband, and tuck it into the weave. This weaving process is called 'weaving with three warps'. You'll be going around the outer cord with your working strand, under the center two cords(which you treat as one cord), and around the other outer cord. You weave it back over the center two strands and around the outer, continuing this process, back and forth. Try not to leave too much slack as you go to keep the weave uniform. Every couple of weaves, push your work tight, up towards the starting buckle end.

Step 3 in Woven Paracord Bracelet/Watchband

Image
Step 3: Add the watch and adjust for wrist size If making as a watchband, this is where you take the strands of paracord from the looped section of the buckle and run them over the watch pin, under the watch, and over the other watch pins. Then you loop the paracord around the other buckle end twice.  At this point, you'll measure the distance between the buckle ends for your wrist size. The distance should be equal to your actual wrist measurement. The weaving process will stretch this original spacing of bracelet/watchband about another inch after tightening as you reach the finishing point.   *Don't include the prong section half of the male end of the buckle in your measurement. It is snapped into the female half of the buckle when worn and isn't used in figuring the wrist measurement.   Now bring the cord ends back thru the watch pins, along side your first pass, and around the starting buckle end.   *If

Step 2 in Woven paracord bracelet/watchband

Image
Step 2: To begin Measure about 20 inches from one end of your length of paracord. This is where you'll loop onto one end of your side release buckle. Once attached, you'll have the longer section which will be your working end and the shorter end which is just attached to the buckle ends and will be tucked in when finishing the bracelet/watchband.

Woven paracord bracelet/watchband :Step 1

Image
This tutorial will show how to make a Paracord  bracelet or watch band using a weaving method. Step 1: Supplies For this project, you'll need approximately 10 feet of paracord, scissors, lighter, tape measure, hemostats, watch, and a  5/8" side release buckle . Paracord can be found at local Army/Navy stores or from various online sources:  A mazon ,  S hopclues , ebay, etc... The actual amount of paracord that will be used depends on your wrist size, cord, and tying technique(tight/loose). A typical wrist is about 8.5 inches and I actually used around 8 or 9 feet after finishing the bracelet/watchband. So using 10 feet is usually a safe estimate for most folks, since having too much cord is better than coming up short when making your project. *If making a watchband, the watch needs to have about 5/8" space between the lugs(where the watch pins go) so that 5 strands of paracord will fit.

10th use in 10 Unusual uses of Ice cubes

Image
Step 10: Makeup primer for smaller pores This is a great trick to use before you put makeup on. Wrap up an ice cube in a paper towel or thin washcloth and rub it all over your face. The ice cube will reduce redness and shrink your pores so it's great for priming your face for makeup! Plus, it'll cool down your skin, which is perfect for putting makeup on during the summer. :D

Step 9 in 10 Unusual uses of Ice cubes

Image
Step 9: Remove dents from carpeting Note: This one can be a little hit and miss, but it can't hurt to give it a go! This tip works best on higher pile carpeting - the lower the pile, the less it will be able to expand as it dries and fix the dents. :) Place the ice cubes along the dent and leave them to melt. As they melt and the carpet begins to dry, it'll fluff back up and look normal again.

Step 8 in 10 Unusual uses of Ice cubes

Image
Step 8: Help fight pimples Ice cubes can help fight combat pimples because the cold lessens the swelling, irritation and redness that occurs! I've also read using ice on a pimple can shrink it, but I'm not totally sure on that. I think what folks are really seeing is the swelling going down because the ice is reducing the inflammation in that spot - not the pimple being "cured." ;) Wrap an ice cube in a washcloth or paper towel and hold it over the pimple for a minute or so. The cold will cause a temporary redness on the spot, but it will go away once your skin warms up a bit. You can repeat this as needed, just don't leave the ice on your skin so long that it starts to burn or hurt. It's especially nice if you get deep cystic acne - I had a few years where I got cystic acne on my cheeks all the time and this really helped with the pressure and pain.

Step 7 in 10 Unusual uses of Ice cubes

Image
Step 7: Skim fat from soups and stews If you have a metal ladle or a small metal container to put some ice cubes in, you can speed up the process of removing excess fat from a soup or stew. :D Fill up the ladle or container with ice, and drag it across the surface of soup or stew. The drop in temperature will cause the fat to harden and stick to the outside metal. Use a paper towel to wipe the fat from the ladle and keep going until you're happy with how much fat you've removed.

Step 6 in 10 Unusual uses of Ice cubes

Image
Step 6: Less painful splinter removal Splinters are the worst. THE WORST But ice cubes can help! Next time you get a splinter, use an ice cube to numb the area before you start picking at it. This even works for the terrible ones you get under your fingernails. :)

Step 5 in 10 Unusual uses of Ice cubes

Image
Step 5: First aid for bruising If you're like me and bruise crazy easy (yay blood diseases!!!), ice cubes may be able to put a stop to it before it starts! Bruising occurs when you damage the skin via blunt force and capillaries under the skin burst. These capillaries release small amounts of blood under your skin since it has no where else to go. To help prevent and lessen the severity of bruises, apply ice right after an injury. Wrap ice cubes in a towel or wash cloth and hold the ice over the place the bruise is sure to form. The cold from the ice will close up the capillaries so you don't end up with extra bleeding and seeping, meaning you'll wind up with a smaller and less pronounced bruise. :)

Step 4 in 10 Unusual uses of Ice cubes

Image
Step 4: Relief for eyebrow tweezing and epilation Ice cubes are a great way to numb your skin! If you hate tweezing your eyebrows (or epilating anywhere!), ice can really help out. Wrap an ice cube in a wash cloth and hold it on the area you'll be removing hair from. Hold it there just until it's nice and numb and then get to plucking. Keep extra ice cubes nearby for when the numbness wears off. :) You can also use ice after hair removal if the skin there is really sensitive to get some pain relief.

Step 3 in 10 Unusual uses of Ice cubes

Image
Step 3: Numb your tongue before taking medicine This is so so useful for choking down terrible tasting liquid medicine. I don't know about you guys, but I'd rather take 8 million horse-sized pills before taking liquid cough syrup or painkillers. BLECH Holding your nose definitely helps, but an ice cube will seal the deal. Suck on a ice cube just until your tongue gets numb. Once it's numb, take the medicine immediately! When your tongue is numb you won't be able to taste the bitterness very much at all. :)

Step 2 in 10 Unusual uses of Ice cubes

Image
Step 2: Perfectly reheated rice Just place an ice cube on top before microwaving! The ice will melt and then steam as the rice reheats. :)

Step 1 in 10 Unusual uses of Ice cubes

Image
Step 1: Remove gum from clothing, carpet and hair Ice cubes are great at removing gum from all sorts of surfaces. The ice cubes freeze the gum, which will allow you to chip the gum away. :) If the gum is on a piece of clothing, put the clothing in the sink and cover it with ice cubes. Let the clothing and ice cubes hang out for a bit and chip away the gum once it's frozen!  If the gum is on carpet, put ice cubes right onto and let them sit there until the gum is nice and frozen. Then you can chip the gum away with a butter knife. Removing gum from hair is a little more hit and miss. Wrap the hair with the gum in it and some ice cubes up in a washcloth until the gum is frozen. At that point, you should be able to use your fingers to break apart the gum and free your hair. If ice cubes fail for getting gum out of hair, try oil, peanut butter or mayo - those work really well but are definitely messier. :D

10 Unusual uses for Ice cubes

Image
Ice cubes can be found in nearly every kitchen. Turns out they have loads of unusual uses you might not know about! From cleaning to cooking to beauty - there are so many uses! I've only included uses for ice cubes that I've personally tested or used before, but I know there has to be more uses out there. :D Have an unusual use for ice cubes that I don't mention here? Tell us about it in the comments!

Step 9,10 in 10 Unusual uses of Nail Polish

Image
Step 9: Rustproof Metal Apply clear nail polish to metals that are vulnerable to rusting, i.e. in the bathroom or outdoors. Some Ideas : Shaving Cream  - If you shaving cream can creates rust rings on your bath tub, apply a thin layer of nail polish to the bottom. Screws  - in patio furniture, or the toilet Car Paint  - keep chipped car paint from rusting by coating the damaged areas with nail polish. Step 10: Liquid Bandaid I heard this one from my friend!  She uses clear nail polish as a liquid bandaid.  Apparently its the same thing...who knew!

Step 6,7,8 in 10 Unusual uses of Nail Polish

Image
Step 6: Tighten Loose Screws For an extra hold, coat your screws in nail polish.  After setting the screws let the polish dry.  This should give you added durability. Step 7: Color-Code Objects Color code objects to easily distinguish them.  I color coded my keys with nail polish so I can quickly figure out which key is for my front door! Step 8: Mark Levels in a Bucket Mark levels on measuring cups or buckets.  For your cleaning bucket you can mark how much soap you need and another level for how much water you need.

Step 4,5 in 10 Unusual uses of Nail Polish

Image
Step 4: Prevent Costume Jewelry from Tarnishing Ever get those green rings on your fingers from wearing a costume ring?  Paint a thin coat of clear nail polish on your costume jewelry to prevent tarnishing. Step 5: Keep Laces and Rope from Unraveling You may have heard that burning the ends of cut rope prevent it from fraying.  Nail polish works just as well!  Just coat the ends of your shoe laces or rope with clear nail polish (or colored nail polish for some fun) to prevent any fraying.

Step 2,3 in 10 Unusual uses of Nail Polish

Image
Step 2: Seal an Envelope Ever see that episode of Seinfeld where George's fiance dies from licking too many wedding invitations? Avoid licking that gross glue on the back of an envelope.  Just seal it with a little bit of clear nail polish Step 3: Threading a Needle It can be a pain in the butt trying to thread a needle!  I know I have had my moments where I've had to walk away from projects because it gets too frustrating. A quick fix for this is dipping the end of your thread in a small amount of nail polish for easy thread-ability.

10 unusual uses of Nail Polish

Image
If you're anything like me you have bottles of nail polish building up in your desk drawer from years ago.  What you might not know is there are plenty of ways to put that nail polish to use besides just decorating your fingers.  Here are 10 new uses for nail polish that will help you with day to day tasks around the house! Step 1: Smudge Proof Lables Prevent ink from running on your labels.  Coat the labels that identify your garden plants, or the labels that distinguish your shampoo bottles with clear nail polish.